Located At
Sales: ClosedService: Closed

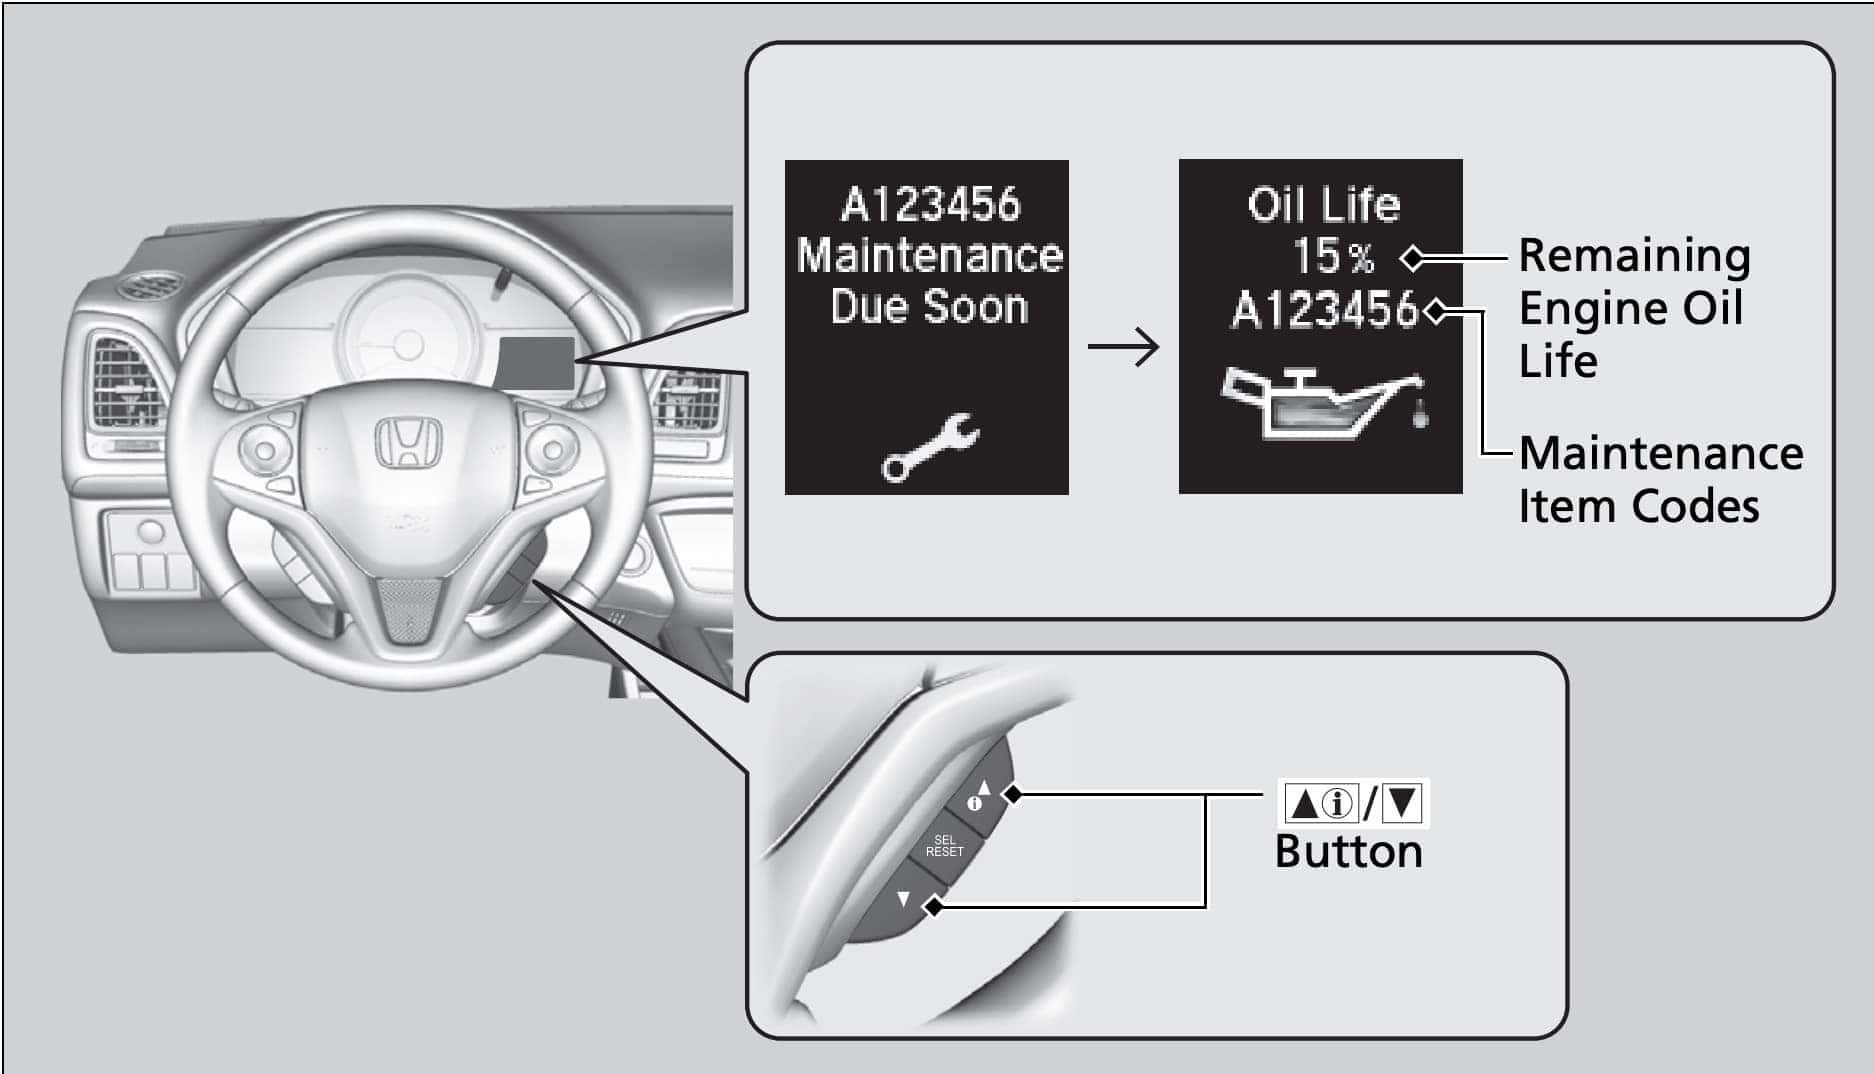
The Honda Maintenance Minder system is designed to simplify vehicle upkeep by alerting you to necessary maintenance tasks right on your dashboard. When the system detects that service is due, it displays specific service codes, which you can decode using the charts provided.
The Main Honda Service Codes List gives an at-a-glance understanding of primary maintenance tasks — such as “A” for a simple oil change or “B” for a more comprehensive service including oil, filter, brake, and suspension checks.
Meanwhile, the Sub — Honda Maintenance Codes Chart drills down into additional items like tire rotation, transmission fluid refresh, or spark plug replacement.
Together, these charts create an essential step-by-step roadmap to ensuring your Honda runs smoothly while preventing more significant issues in the future.
FOR EXAMPLE:
| Code | What It Means | What to Do |
|---|---|---|
| A CODES | ||
| A | ☐ Change Engine Oil | ✔︎ Completely drain the used oil & refill using the manufacturer‐approved oil type.
✔︎ After refilling, verify the oil level with the dipstick and inspect around the drain plug and filter for any leaks. ↳ Ps. It is highly recommended to replace the oil filter whenever changing the oil of a vehicle. |
| B CODES | ||
| B | ||
| ☐ Change Engine Oil
☐ Replace Oil Filter |
✔︎ Completely drain the used oil, replace with a new oil filter, and refill using the manufacturer‐approved oil type.
✔︎ After refilling, verify the oil level with the dipstick and inspect around the drain plug and filter for any leaks. |
|
| ⬇︎ INSPECT ⬇︎ | ||
| ☐ Front & Rear Brake Assemblies | ✔︎ Conduct a visual and tactile inspection of brake pads and rotors.
✔︎ Use a micrometer or thickness gauge to ensure rotor wear is within acceptable limits and look for uneven wear or cracks. |
|
| ☐ Parking Brake Adjustment | ✔︎ Test the parking brake by checking pedal resistance and the number of clicks, normally between five to seven.
✔︎ Ensure the mechanism holds the vehicle securely when engaged. |
|
| ☐ Tie Rod Ends
☐ Steering Gearbox ☐ Protective Boots |
✔︎ Inspect for torn or cracked boots and assess for any abnormal play in the tie rod ends.
✔︎ Confirm that the steering gearbox is free of leaks and damage. |
|
| ☐ Suspension Components | ✔︎ Check all ball joints, bushings, and mounting hardware for secure fitment.
✔︎ Look for signs of rust, wear, or looseness that could affect ride quality and handling. |
|
| ☐ Driveshaft Boot Integrity | ✔︎ Observe for any splits, cracks, or hardened areas in the boot.
✔︎ Ensure that securing clamps or bands are tight to prevent contamination. |
|
| ☐ Brake Hoses
☐ ABS/VSA Wiring |
✔︎ Look for cracks, kinks, or blistering on the hoses.
✔︎ Verify that connections at the master cylinder and ABS module are secure and free of oil contamination. |
|
| ☐ All Fluid Levels & Conditions | ✔︎ Using proper diagnostic tools, check the levels and clarity of the engine coolant, transmission fluid, brake fluid, and, if applicable, rear differential fluid.
✔︎ Look for discoloration which might indicate contamination. |
|
| ☐ Exhaust System | ✔︎ Examine the mufflers, piping, and heat shields for signs of corrosion, loose fittings, or damage that might result in leaks or reduced performance. | |
| ☐ Fuel Lines & Connection Points | ✔︎ Inspect all hoses and clamps for cracks, wear, or looseness.
✔︎ Ensure fittings are secure to prevent fuel leakage. |
|
The Honda Maintenance Minder triggering the A service code primarily signals that it’s time to change the engine oil.
For example, if you drive using synthetic oil under normal, moderate conditions, you might expect the A service code to be triggered around 7,500 to 10,000 miles – however, this distance can be affected by various factors (see below).
7,500 to 10,000 miles: In daily urban or mixed driving conditions, the oil life depletes gradually, and the A service code appears when the engine oil loses its optimal performance.
The A code indicates that the engine oil needs replacing to maintain smooth engine operation and protect internal components. Once the oil change is performed, it’s important to reset Honda Maintenance Minder codes in order to restart the monitoring cycle.
The Honda Maintenance Minder triggering the B service code is more comprehensive, indicating that your vehicle not only needs an oil and filter change but also requires several component inspections.
For instance, in your Honda that gets used for regular commuting, you might see the B maintenance code appear every 15,000 to 20,000 miles — approximately every other oil change. Consider the following details:
15,000 to 20,000 miles: The Honda Maintenance Minder B service code is designed to trigger a full-service review that covers oil, filter, brakes, suspension, and various driveline components.
Beyond a simple oil change, the B code calls for a thorough examination of multiple systems such as brake assemblies, parking brake adjustments, tie rod ends, suspension parts, and even checks on fluid levels. Following the comprehensive checklist helps catch potential issues early, ensuring a safer driving experience. After completing all the recommended tasks, its essential to reset Honda Maintenance Minder codes so the system can accurately track your next maintenance interval.
| CODE | WHAT IT MEANS | WHAT TO DO |
|---|---|---|
| 1 | ☐ Tire rotation
☐ Tread Depth ☐ Tire Pressure evaluation |
✔︎ Rotate tires following the recommended cross-pattern supplied in the owner’s manual.
✔︎ Verify tire pressures with an accurate gauge and check tread depth for signs of uneven wear. |
| 2 | ☐ Replace Air Filter Element
☐ Replace Cabin Dust & Pollen Filter ☐ Inspect Drive Belt |
✔︎ Remove and inspect the engine air filter for debris or clogging, replacing it if needed.
✔︎ Similarly, change the cabin filter if airflow is reduced. ✔︎ Finally, examine the drive belt for cracks, fraying, and proper tension, adjusting or replacing it if necessary. |
| 3 | ☐ Transmission Fluid Refresh | ✔︎ Drain the old transmission fluid and, if applicable, replace the filter component.
✔︎ Refill with the exact type and volume specified by Honda, ensuring smooth gear changes and optimal performance. |
| 4 | ☐ Replace Spark Plugs
☐ Replace Timing Belt ☐ Verify Water Pump Operation ☐ Inspect Valve Clearance |
✔︎ Remove and install spark plugs at the recommended gap with care.
✔︎ Replace the timing belt (along with tensioners and idler pulleys) as per the service schedule and confirm the water pump is working correctly. ✔︎ Use a feeler gauge to measure valve clearances and adjust them according to factory specifications. |
| 5 | ☐ Engine Coolant Renewal | ✔︎ Flush the cooling system thoroughly, then refill with the Honda-approved coolant mixture.
✔︎ Ensure proper bleeding of the system to eliminate air pockets that can cause overheating. |
| 6 | ☐ Rear Differential Fluid Replacement
AWD models |
✔︎ Drain the old differential fluid and clean the housing before refilling with the correct Honda fluid.
✔︎ Check for any signs of metal particulates which could suggest internal wear. |
| 7 | ☐ Brake Fluid Replacement | ✔︎ Empty the brake fluid reservoir completely and then bleed the brake lines to remove any trapped air.
✔︎ Refill with fresh, manufacturer-recommended brake fluid, and follow up with a functional test of the brake pedal. |
Honda’s Maintenance Minder system isn’t just about the primary A and B codes; it also incorporates sub-codes that guide you on additional services.
Although these intervals can vary based on driving conditions and model specifics, many Honda owners can expect the following average mileage ranges:
Average Mileage: Approximately 7,500 to 10,000 miles
Overview: Under normal driving conditions, tire rotation is recommended either at every oil change service or as part of a comprehensive service interval. This ensures even wear on tires and consistent performance.
Average Mileage: Typically around 15,000 miles
Overview: If you frequently drive through dusty environments or in areas with elevated pollution levels, this sub-code may appear sooner. Routine checks help maintain optimal engine airflow and belt condition.
Average Mileage: Generally around 60,000 miles for normal driving; however, severe conditions (such as mountainous terrain or towing) can necessitate changes as early as 25,000 to 30,000 miles
Overview: Regular transmission fluid changes preserve smooth gear changes and extend transmission life, especially when the vehicle is used under more demanding conditions.
Average Mileage: Often between 60,000 and 100,000 miles
Overview: Spark plugs and valve clearance adjustments are usually part of a higher-mileage service routine. It’s important to adhere to these intervals to ensure optimal engine performance, especially if your driving includes extreme weather or high mileage.
Average Mileage: Commonly around 60,000 miles
Overview: A coolant flush and refill maintain engine temperature consistency and prevent corrosion. This sub-code reminds you to check for coolant degradation over time.
Average Mileage: Approximately 30,000 to 45,000 miles
Overview: The rear differential fluid keeps the driveline running smoothly on AWD vehicles. Regular intervals help prevent contamination and reduce wear on internal components.
Average Mileage: Typically every 3 years, which may translate to roughly 30,000 to 40,000 miles for regular drivers
Overview: Brake fluid can absorb moisture over time, reducing braking efficiency. This sub-code serves as a reminder to refresh the brake fluid to maintain optimal safety performance.
Using these detailed charts of Honda Service Codes with the Honda Maintenance Minder system creates an effective maintenance strategy. They empower both novice and experienced drivers to diagnose what their cars need quickly and precisely, reducing downtime, extending the life of essential components, and ultimately saving money by preventing costly repairs.
The clear, step-by-step instructions provided next to the Honda Maintenance Codes in the charts ensure that every critical maintenance task — from a routine oil change to a comprehensive brake system check — is performed correctly, keeping your Honda in top condition for daily driving and long-term reliability.
Resetting your Honda Maintenance Minder is an essential step after completing any recommended maintenance work. This process clears the service codes and restarts your vehicle’s maintenance tracking, ensuring that your next service reminder is accurately scheduled. In this guide, we explain how to Reset Honda Maintenance Minder Codes in a straightforward, easy-to-follow manner.
Resetting the system correctly ensures that your Honda’s onboard diagnostics will provide timely alerts for future service intervals. This simple procedure helps maintain optimal engine performance and prolongs the lifespan of your vehicle by preventing potential damage from overdue maintenance.
For example, if you recently performed an oil change on your Honda Civic, following the steps above to Reset Honda Maintenance Minder will update the system. This not only clears the current service alert but also resets the cycle so that you’ll receive the next reminder at the appropriate mileage. Always refer to your owner’s manual for any model-specific instructions to ensure the reset process is done safely and effectively.
By routinely resetting your Maintenance Minder after each service, you ensure that your Honda remains in peak condition and that you never miss a critical maintenance appointment again. This proactive approach can help reduce unexpected repairs, save money, and keep your driving experience smooth and worry-free.
At Fisher Honda in Boulder, CO, we understand that your vehicle is more than just a mode of transportation—it’s a vital part of your everyday life. Our service department is dedicated to ensuring that your Honda performs at its best, backed by years of expertise and a commitment to outstanding customer care.
Our factory-trained technicians specialize in Honda vehicles, meaning they are exceptionally skilled at diagnosing issues and performing maintenance according to manufacturer guidelines. From routine oil changes using the precise guidelines outlined by Honda’s Maintenance Minder system to comprehensive services involving brake inspections and fluid replacements, we use clear, step-by-step processes to keep your car running optimally. Our commitment to precise service not only maximizes your vehicle’s longevity but also protects you from unexpected repair costs. Take advantage of our Service Coupons for even better pricing.
Based in Boulder, we know that local driving conditions can be unique—from the challenges of variable weather to the demands of mountain roads. This local insight allows us to provide service recommendations tailored specifically to your environment. Whether it’s scheduling preventative maintenance or addressing specific service codes with clear, accessible charts, our team takes the time to explain every detail, ensuring you feel confident about your vehicle’s upkeep.
Choosing Fisher Honda means partnering with a team that values transparency, reliability, and personalized care. We go beyond just fixing your car—we work with you to create a long-term maintenance plan that keeps your vehicle in peak condition. Our state-of-the-art service center and streamlined processes mean that every visit is as convenient and stress-free as possible, letting you get back on the road quickly with peace of mind.
At Fisher Honda, we’re proud to serve the Boulder community. Our focus on building lasting relationships through exceptional service and honest communication has made us a trusted partner for vehicle care in the area. We treat every Honda as if it were our own, combining technical excellence with heartfelt customer service to ensure that your driving experience is safe, comfortable, and worry-free.